Considering making your own Halloween costume this year? Get creative and use whatever you have in your closet or get a few of these items from the thrift shop. Using your imagination and putting different items together is a little more thrilling than tossing a sheet over your head. Here are a few easy-to-do costumes/hair/makeup that we love this season. Hope these inspire you! - Your Shear Style Team
Showing posts with label shear style winnipeg. Show all posts
Monday, 22 October 2012
Monday, 13 August 2012
Looking Great In Grey!
Going grey has never been so hot! Grey hair usually coincides with getting older,ageing,wrinkling and weakening, however in the past year stylists have seen a number of young women asking for the silver locks. Like most trends, it all started in the fashion industry. Models could be seen with grey hair in many variations, from matte to silver grey. Younger style icons like Lady Gaga soon picked up this stand-out look and as it trickled down the pipe of popularity we say more and more shades.
If you have it,embrace it and if you don't here is what you need to know about getting it...
1) Your hair will need to be decolourised, otherwise known as "striped". This means all the colour will be pulled from your hair in order for the proper shade of grey to hold. This is a rather harsh chemical treatment.
2) Your hair will need to be washed with Blue or Purple Shampoo. This is to prevent a yellowish undertone, and keep your greys from tinting.
3) Because this is a harsh process you may require weekly conditioning treatments and regular trims as the process as a while can cause hair to break,tangle and become dry.
All in all, we think it's a great look! But weight out the pros and cons before you choose to go grey!
Thursday, 5 July 2012
Retinol Magic
![]() |
| Highest Over-The-Counter Retinol Concentration |
Trying to fight signs of ageing? What about blemish scaring or uneven skin tone? If you haven't already heard of the benefits of Retinol than let us at Shear Style tell you!
What It Is...
Retinoic acid is known to plump wrinkles, release collagen and battle sun damage and the breakdown of collagen.
How Fast It Works...
After 4-8 weeks of daily application (preferably at night, as intensity degrades in the light), skin will appear less wrinkled and more even-toned, however 2-6 months is your goal with upkeep! www.besthealthmag.ca quote's Dr. Alastair Carruthers, a Vancouver dermatologist saying...
"This is a lifetime commitment; if you stop, age spots usually re-appear within weeks and wrinkles deepen again."
The Side Effects...
Irritation, peeling, dryness and redness are common in first- time users.
Where You Can Get It...
Many cosmetic skincare lines offer anti-aging creams containing retinol. Ask a skincare specialist in your local beauty department for more information.
Helpful hint : Product Packaging Matters
- "Because retinol degrades with exposure to light and air, you should choose one with packaging that blocks out both. One-dose capsules that you apply to skin, such as Philosophy Booster Caps ($50 for 60) or products packaged in aluminum, like Vichy Liftactiv Retinol HA ($49, 30 mL), or in opaque glass bottles, like RoC Retin-Ox Wrinkle Correxion Intensive Anti-Wrinkle Serum ($50, 30 mL) or a three-layer tube under a nitrogen blanket protects the retinol in Olay Professional Pro-X Deep Wrinkle Treatment ($55, 30 mL)."
Helpful hint : Highest Concentration Product
- "SkinCeuticals (available through skincare professionals) Retinol 1.0 Maximum Strength Refining Night Cream ($56, 30 mL) contains 1.0%—uniquely, that’s printed right on the package.
- Canadian brands Alyria (sold at physicians’ offices) and drugstore brand Dermaglow Nuvectin Retinol-Px face cream ($75, 45 mL) contains 0.15% retinol. Alyria Retinol Night Complex 1 ($50, 30 g) contains 0.15%, while Night Complex 2 ($60, 30 g) is stronger, at 0.30%.
RoC, L’OrĂ©al Paris, and Vichy do not have any mention of concentration and refuse to release any such information.
Labels:
antiaging,
beauty,
bio ionic,
Celebrity,
freckles,
haircare,
haircut,
haircut winnipeg,
retinoic acid,
retinol,
Shear Style,
shear style winnipeg,
skin,
skin tone,
skincare,
wrinkles
Tuesday, 15 May 2012
Mens Long Hair Styles
Please accept our sincerest apologies. Our previous blogposts have been all geared towards women - new styles, great hair products, funky solutions and more. It's about time we provide some content about men. It may not be him who's reading this blog, but certainly YOU can pass on a few simple suggestions to help influence his next hair decision. That's what friends are for! And guess what?
These guys have gone a bit beyond simply shaking their head like a dog when exiting the shower. It's not the 80's anymore, but what do you think of the long-haired look on guys?
Shear Style does haircuts for men as well!
When it comes to experimenting with guys' hair, the more the better. Lots of men refer to long hair as "FLOW" and although they may claim not to pay too much attention to their hair, they really do. If you talk to hockey players, they will tell you they invented the look and that it exudes power. Anyways, let's explore some suave styles for guys with long locks, and by explore we mean browse through this gallery of long-haired dudes. Perhaps some of these cuts will captivate your senses.
| Celebrity Ben Barnes, UK actor who |
| One Tree Hill star Chad Michael Murray with ahead of hair just long enough to make our list. |
| Celebrity Garrett Hedlund with golden locks |
![]() |
| Sweeping flow, looks good with the sport jacket! |
| Long bangs, slicked back, very GQ |
| Long side bangs, very wavy |
These guys have gone a bit beyond simply shaking their head like a dog when exiting the shower. It's not the 80's anymore, but what do you think of the long-haired look on guys?
Thursday, 29 March 2012
Hair how to: ethereal, fluffy curls.
Against the delicate features of golden haired Lily Hart, these soft, brushed out curls have an ethereal aura. Straight on top, then bursting out voluminously on the sides, it’s a style that also oozes soft 70s glamour if paired with some metallic eyeshadow and a retro-inspired frock. To create the look for yourself, follow this how-to guide:

Section off the hair by dividing it into half and pinning with sectioning clips. Starting at the back, take horizontal partings and use a small curling iron to curl each under into a tight curl.


Continue taking horizontal parting, curling hair all the way up the back of the head. Once you've curled up to the ear section, follow the partings from the back of the head to the front hair line.


Continue taking horizontal parting, curling hair all the way up the back of the head. Once you've curled up to the ear section, follow the partings from the back of the head to the front hair line.
At the front hairline, keep curling hair back from the face as this will give you more width and create a softer look for most face shapes.


As you get high on the head (i.e. the top layers of hair) start dragging the curls. This will create a build up of weight for the curls and have a flatness to the top of the head. You can drag the curls down to either eye level or ear level depending on where you want the volume to start from.


Once you’ve curled all the hair, get a brush (a soft cushion brush works best) and softly brush out the curls. Using your fingers and the brush, adjust the width and shape of the hair.


Once you’re happy with the desired shape, spray the hair in place with some hair spray.
Friday, 24 February 2012
All About Straight Hair
Your natural wave loves to be curled and styled, and yet is easy to straighten and looks fabulous worn straight. Women with tight curly hair, or fine, dead straight hair that has little body and refuses to hold curl (yes, that's me!) struggle to style our hair at times.
If your hair is not quite as straight as you want it, you have some easy options to temporarily straighten your hair: straightening products, hair dryer or straightening iron.
If your hair is really not straight and you want to get rid of your curl permanently (well, at least 6 months), you have the option of professionally straightening your hair.
HOW TO BLOW DRY HAIR STRAIGHT
Blowdrying your hair straight is definitely the cheaper option to permanently straightening your hair - all it takes is a few tools and products and a bit of practice.
WHAT DO I NEED?
Comb with a wide-toothed comb to remove any tangles. Partially blow-dry your hair to get rid of excess moisture.
Spray a volumising tonic on your hair, or a handful of mousse spread from tips to ends for extra oomph.
Pin hair up and take out small sections at a time to blow-dry. Hold the dryer in one hand and a styling brush in the other.
Place the brush underneath the first section of hair and position it at the roots. Keep the tension on the hair (without tugging too hard) and move the brush down towards the ends, while directing the air flow down the hair, following the movement of the brush.
Blow-dry using a large, round brush with a metal core. Wind hair completely up the brush, focusing on creating lift at the roots. Gently blast hair with a hair-dryer until dry.
Browse our range of Hairdryers.
Curl the brush under at the ends to achieve a slight bend. Continue until the back sections are completely dry and then repeat on the top sections of hair.
Remember, practice makes perfect!
HOW TO USE A STRAIGHTENING IRON
WHAT DO I NEED?
- A temperature controlled straightening iron
- Styling products - products that protect your hair from moisture and hold the style. Moisture is what reverts the hair back to its natural wave, so products like mousse protect hair from moisture as well as heat damage.
THINGS TO REMEMBER:
Also start with clean, DRY hair. If possible, use a leave-in conditioning spray after washing your hair, but before starting to straighten.
Hair must be completely dry, as slightly damp hair will respond badly to straightening. Also using a heated appliance on damp hair causes the hair to "cook" from the steaming, swelling the hair shaft and forcing the protective moisture from the cortex of the hair.
Use a flat iron appropriate for your hair length. Wider irons are suitable for very long hair, but most women are better off using an appliance with heating plates 1" to 1 ½ " wide. These smaller irons offer better control and are lighter in weight.
Section your hair into small, manageable sections. If you try and straighten a big chunk of hair at once, you will get an uneven result. The hair on the outside might straighten but hair in the middle won't have been straightened. Work on smaller sections and you will get a much straighter look.
Use a small amount of styling product to maintain the style. Using a spray of hairspray on the straightened sections, or a small amount of mousse or gel when drying your hair, will extend the life of your hair style. Your straightened hair will last longer.
INSTRUCTIONS
Take a small section of hair. Starting at the roots, work the flat iron through the length of your hair slowly, but keep the iron moving.
After each draw, comb your hair smooth.
Continue, piece by piece until all of your hair is straight.
PROFESSIONAL HAIR STRAIGHTENING
If your hair is not quite as straight as you want it, you have some easy options to temporarily straighten your hair: straightening products, hair dryer or straightening iron.
If your hair is really not straight and you want to get rid of your curl permanently (well, at least 6 months), you have the option of professionally straightening your hair.
HOW TO BLOW DRY HAIR STRAIGHT
Blowdrying your hair straight is definitely the cheaper option to permanently straightening your hair - all it takes is a few tools and products and a bit of practice.
WHAT DO I NEED?
- A hairdryer
- A large round brush. The size of the brush will depend on the length of your hair - your hair needs to be long enough to wrap around the brush once.
- A large paddle brush for final smoothing.
- Clips to keep hair out of the way. Large flat clips that hairdressers use work best.
- Styling products - products that protect your hair from moisture and hold the style. Moisture is what reverts the hair back to its natural wave, so products like mousse protect hair from moisture as well as heat damage.
- Gloss or serum to smooth over hair, remove frizz and finish off the look
- A large round brush. The size of the brush will depend on the length of your hair - your hair needs to be long enough to wrap around the brush once.
- A large paddle brush for final smoothing.
- Clips to keep hair out of the way. Large flat clips that hairdressers use work best.
- Styling products - products that protect your hair from moisture and hold the style. Moisture is what reverts the hair back to its natural wave, so products like mousse protect hair from moisture as well as heat damage.
- Gloss or serum to smooth over hair, remove frizz and finish off the look
Comb with a wide-toothed comb to remove any tangles. Partially blow-dry your hair to get rid of excess moisture.
Spray a volumising tonic on your hair, or a handful of mousse spread from tips to ends for extra oomph.
Pin hair up and take out small sections at a time to blow-dry. Hold the dryer in one hand and a styling brush in the other.
Place the brush underneath the first section of hair and position it at the roots. Keep the tension on the hair (without tugging too hard) and move the brush down towards the ends, while directing the air flow down the hair, following the movement of the brush.
Blow-dry using a large, round brush with a metal core. Wind hair completely up the brush, focusing on creating lift at the roots. Gently blast hair with a hair-dryer until dry.
Browse our range of Hairdryers.
Curl the brush under at the ends to achieve a slight bend. Continue until the back sections are completely dry and then repeat on the top sections of hair.
Remember, practice makes perfect!
HOW TO USE A STRAIGHTENING IRON
WHAT DO I NEED?
- A temperature controlled straightening iron
- Styling products - products that protect your hair from moisture and hold the style. Moisture is what reverts the hair back to its natural wave, so products like mousse protect hair from moisture as well as heat damage.
THINGS TO REMEMBER:
Also start with clean, DRY hair. If possible, use a leave-in conditioning spray after washing your hair, but before starting to straighten.
Hair must be completely dry, as slightly damp hair will respond badly to straightening. Also using a heated appliance on damp hair causes the hair to "cook" from the steaming, swelling the hair shaft and forcing the protective moisture from the cortex of the hair.
Use a flat iron appropriate for your hair length. Wider irons are suitable for very long hair, but most women are better off using an appliance with heating plates 1" to 1 ½ " wide. These smaller irons offer better control and are lighter in weight.
Section your hair into small, manageable sections. If you try and straighten a big chunk of hair at once, you will get an uneven result. The hair on the outside might straighten but hair in the middle won't have been straightened. Work on smaller sections and you will get a much straighter look.
Use a small amount of styling product to maintain the style. Using a spray of hairspray on the straightened sections, or a small amount of mousse or gel when drying your hair, will extend the life of your hair style. Your straightened hair will last longer.
INSTRUCTIONS
Take a small section of hair. Starting at the roots, work the flat iron through the length of your hair slowly, but keep the iron moving.
After each draw, comb your hair smooth.
Continue, piece by piece until all of your hair is straight.
PROFESSIONAL HAIR STRAIGHTENING
PERMANENT STRAIGHTENING
What is it? It's a perm that improves the condition of the hair as it straightens it. There are a few names for it - Bio Ionic Professional Haircare System, Japanese Ionic Hair Straightening - yet they are all the same.
How does it work? First a treatment to prep your hair. Next, a setting solution. Then a rinse and light dry off before hours of flat-iron work. After this, you have straight hair. They rinse again and apply a solution so your hair remembers to stay straight. A quick dry off and iron and you're done. But no washing your hair for two days.
What hair types are (most) suitable? Those with thick, healthy, unbleached hair are the best candidates.
Which hair types are not suitable? Fine, weak or dry hair or hair that is overly processed/colored. However there are lotions that cater to variations in strength and thickness, meaning those with fine but strong hair can still get the treatment.
How long does it take? Usually about five hours. If the hair is very thick, curly or long it can take up to 10 or 11 hours.
How much does it cost? It can range anywhere from $150 to $1000 depending on the salon and the particular solutions being used (ie Bio Ionic is more expensive than Japanese solutions)
Some quick-fixes include using permanent straighteners and relaxers- most of which you can find in supermarkets and drug stores to apply in your own home.
A relaxer is best suited for people who have hair that is especially difficult to style. This usually applies to people of African or Caribbean descent who have coarse and frizzy hair. The relaxer is a strong chemical substance that is applied to dry hair and then left on the hair anywhere from 15 to 45 minutes. The relaxer works chemically with the composition of your hair, weighing it down in certain areas and removing curls. Relaxers must be reapplied to new hair growth.
What is it? It's a perm that improves the condition of the hair as it straightens it. There are a few names for it - Bio Ionic Professional Haircare System, Japanese Ionic Hair Straightening - yet they are all the same.
How does it work? First a treatment to prep your hair. Next, a setting solution. Then a rinse and light dry off before hours of flat-iron work. After this, you have straight hair. They rinse again and apply a solution so your hair remembers to stay straight. A quick dry off and iron and you're done. But no washing your hair for two days.
What hair types are (most) suitable? Those with thick, healthy, unbleached hair are the best candidates.
Which hair types are not suitable? Fine, weak or dry hair or hair that is overly processed/colored. However there are lotions that cater to variations in strength and thickness, meaning those with fine but strong hair can still get the treatment.
How long does it take? Usually about five hours. If the hair is very thick, curly or long it can take up to 10 or 11 hours.
How much does it cost? It can range anywhere from $150 to $1000 depending on the salon and the particular solutions being used (ie Bio Ionic is more expensive than Japanese solutions)
Some quick-fixes include using permanent straighteners and relaxers- most of which you can find in supermarkets and drug stores to apply in your own home.
A relaxer is best suited for people who have hair that is especially difficult to style. This usually applies to people of African or Caribbean descent who have coarse and frizzy hair. The relaxer is a strong chemical substance that is applied to dry hair and then left on the hair anywhere from 15 to 45 minutes. The relaxer works chemically with the composition of your hair, weighing it down in certain areas and removing curls. Relaxers must be reapplied to new hair growth.
Thursday, 2 February 2012
How-to create the new waved flapper bob

The cut:
To state the obvious, the tousled bob will not quite work if you have long hair, so this style is specifically for those who embrace short locks, or even those who like to experiment and surprise themselves. But, Mark Fast and his hair team did take the challenge and made it work for longer hair (see the styling steps below).
If we were to look back at the Flapper era, the traditional cut was always just where the ears ended or slightly above it. It was a clear bob cut. Flapper girls never had their hair long, which also added to androgynous feel of the look.
But when we translate the look in 2012, we want to make it look as modern, glamourous and effortless as we can. Since a very short bob demands high maintenance, make this look yours by keeping your hair shoulder length or an inch below the ears.
However, if you do want to experiment with your locks this New Year, then brave the scissors and go with an above the ear cut. But keep in mind that the styling will be a little more time taking and tricky.
The tools:
To style this look effectively, you’ll need the following tools:
Tail comb brush
Wire rods (if available)
Curling tong
Flat iron
Curl enhancing cream
Working spray
Hairspray
Lots of hair pins
Styling it:
At the Mark Fast spring 2012 show, Tigi’s hair team is to be credited for creating the look on the runway. James Pecis shares his styling tips on ways to get the tousled bob at home and making it street-friendly.
With wire rods:
The styling for a textured, tousled bob works best on second-day hair. If it’s freshly washed then prep the hair with a working spray and run your fingers through it. Tigi used ‘Catwalk by TIGI Session Series Work It Hairspray’ for the runway show.
Create a side part and flip the hair on one side. Use a tail comb brush and backcomb the hair around the hairline and the parting. You need to create a cushion around the head for hairpins to grip on. Don’t backcomb around the crown.
If using wire rods (though not compulsory – see below), wrap small sections of hair in figure of eights around the wire rod. Spray some hair spray on the wire rod. Use a flat iron and set the rods in place. This will give a flat wave in the hair and adhere to the 1920s look. Do it all over the outer layer of your hair.
Leave the wire in for about 20 minutes. On removing the rods, use your fingers to soften and break the shape of the curls.
If you have long hair, take the ends of the hair and secure it underneath with bobby pins. This will create a U-shaped bob with very clean lines.
Spray some hairspray and set the curls in place. The team used ‘Catwalk by TIGI Session Series Finishing Hairspray’ for this particular look.
Pull a few loose pieces out to make the look more distressed and sexy. Finish off with some shine spray, if required.
However, if you’re using a curling tong to create the 20s tousled bob, then follow the steps below.

Prep the hair by following steps 1 and 2 above.
Curl relatively large chunks of hair strands on medium heat.
When the hair has come down to room temperature, use a paddle brush to comb out the curls.
Take a flat iron and flatten the area around the hairline by pressing the hair on medium heat. Don’t run your iron over the curls; it’ll loose its shape. Spray some hairspray and set the curls in place.
Finish off with some shine spray, if required.
Tuesday, 10 January 2012
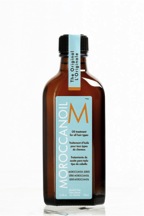
Oil doesn't have to give you that greasy look.

So what’s the product like? The texture is not greasy. If you rub it on your hands, it actually moisturises without feeling sticky. It also acts as a water repellent so your hair dries quicker, plus, it helps to fill in the gaps on your hair shaft, and thus evens out the damaged areas of your hair, increasing shine.
After applying a Moroccan oil hair mask and using some of the oil treatment before blow-drying, hair feels soft and not weighed down or dried out – even after an intense blowout. It doesn’t get flat or oily by the next day either. Turns out this Moroccan Oil craze might be catching on for a reason.
How to use it? Hair can get limp quickly so the idea of oil can turn people away.
Here’s what we learned:
First, wash hair and towel dry.
Use about a quarter-sized dose before combing out your hair as it will help detangle it. Rub the product in your hands and apply from roots to ends, but concentrate on the ends especially if your hair is very fine.
It’s great to put on before using hot styling tools as it protects hair from up to 400-degree heat.
Another great tip: Use it before swimming. Wet hair with tap water, apply the oil and then throw on a bathing cap. This is a trick that protects your hair from drying chlorine and definitely recommend to use it the next time you head to the pool.
Drop by a salon near you to check out the product line.
MOROCCANOIL® Treatment $39/100ml.
Subscribe to:
Posts (Atom)