Considering making your own Halloween costume this year? Get creative and use whatever you have in your closet or get a few of these items from the thrift shop. Using your imagination and putting different items together is a little more thrilling than tossing a sheet over your head. Here are a few easy-to-do costumes/hair/makeup that we love this season. Hope these inspire you! - Your Shear Style Team
Showing posts with label Hair. Show all posts
Monday, 22 October 2012
Friday, 15 June 2012
Your True Colours | Hair Chalking How-To
Are
you familiar with the latest trend in hair today? "Hair Chalking" has been around for a little while now and it’s a
fun way to temporarily add color to your locks.
Create the look without
commitment.
There are several things you need
to know before you go Picasso. So, from our salon mirror to yours, here are the Shear Style tips…
What You’ll Need…
1 soft pastel chalk set ($5 or under at
your local craft store)
1 spray bottle (filled with water)
1
A flat iron/curling iron
Rubber gloves
An old towel/shirt
How You’ll Get The Look...
Step 1:
Spray about a 1-inch section from the tip of your hair with water. The wet
section is the section where the colour will be released.
*** If
you’re blonde or you have blonde tips, DO NOT wet your hair before chalking. I will stain if you do because adding water to pure pigment
creates a real dye.***
Step 2:
Twist the hair and begin to chalk as you do so. The
texture from twisting makes the chalk release more pigment.
Start with the lightest shade first,
since, as you can see, the color gets all over your gloves and you'll end up
with a muddied version of the same hue throughout if you go dark to light.
Step 3:
Wait for your hair to air dry.
Step 4:
Using the curling or flat iron, go over each colored strand. This sets the
colors in your hair, so it will last longer.
Step 5: Then brush out excess and style
away!
***If your not
wanting to the colour to last over a day skip Step 4***
Getting
Chalk Out
Shampoo regularly. A conditioning treatment is strongly recommended to replenish the moisture the
chalk has dried out.
Thursday, 29 March 2012
Hair how to: ethereal, fluffy curls.
Against the delicate features of golden haired Lily Hart, these soft, brushed out curls have an ethereal aura. Straight on top, then bursting out voluminously on the sides, it’s a style that also oozes soft 70s glamour if paired with some metallic eyeshadow and a retro-inspired frock. To create the look for yourself, follow this how-to guide:

Section off the hair by dividing it into half and pinning with sectioning clips. Starting at the back, take horizontal partings and use a small curling iron to curl each under into a tight curl.


Continue taking horizontal parting, curling hair all the way up the back of the head. Once you've curled up to the ear section, follow the partings from the back of the head to the front hair line.


Continue taking horizontal parting, curling hair all the way up the back of the head. Once you've curled up to the ear section, follow the partings from the back of the head to the front hair line.
At the front hairline, keep curling hair back from the face as this will give you more width and create a softer look for most face shapes.


As you get high on the head (i.e. the top layers of hair) start dragging the curls. This will create a build up of weight for the curls and have a flatness to the top of the head. You can drag the curls down to either eye level or ear level depending on where you want the volume to start from.


Once you’ve curled all the hair, get a brush (a soft cushion brush works best) and softly brush out the curls. Using your fingers and the brush, adjust the width and shape of the hair.


Once you’re happy with the desired shape, spray the hair in place with some hair spray.
Friday, 24 February 2012
All About Straight Hair
Your natural wave loves to be curled and styled, and yet is easy to straighten and looks fabulous worn straight. Women with tight curly hair, or fine, dead straight hair that has little body and refuses to hold curl (yes, that's me!) struggle to style our hair at times.
If your hair is not quite as straight as you want it, you have some easy options to temporarily straighten your hair: straightening products, hair dryer or straightening iron.
If your hair is really not straight and you want to get rid of your curl permanently (well, at least 6 months), you have the option of professionally straightening your hair.
HOW TO BLOW DRY HAIR STRAIGHT
Blowdrying your hair straight is definitely the cheaper option to permanently straightening your hair - all it takes is a few tools and products and a bit of practice.
WHAT DO I NEED?
Comb with a wide-toothed comb to remove any tangles. Partially blow-dry your hair to get rid of excess moisture.
Spray a volumising tonic on your hair, or a handful of mousse spread from tips to ends for extra oomph.
Pin hair up and take out small sections at a time to blow-dry. Hold the dryer in one hand and a styling brush in the other.
Place the brush underneath the first section of hair and position it at the roots. Keep the tension on the hair (without tugging too hard) and move the brush down towards the ends, while directing the air flow down the hair, following the movement of the brush.
Blow-dry using a large, round brush with a metal core. Wind hair completely up the brush, focusing on creating lift at the roots. Gently blast hair with a hair-dryer until dry.
Browse our range of Hairdryers.
Curl the brush under at the ends to achieve a slight bend. Continue until the back sections are completely dry and then repeat on the top sections of hair.
Remember, practice makes perfect!
HOW TO USE A STRAIGHTENING IRON
WHAT DO I NEED?
- A temperature controlled straightening iron
- Styling products - products that protect your hair from moisture and hold the style. Moisture is what reverts the hair back to its natural wave, so products like mousse protect hair from moisture as well as heat damage.
THINGS TO REMEMBER:
Also start with clean, DRY hair. If possible, use a leave-in conditioning spray after washing your hair, but before starting to straighten.
Hair must be completely dry, as slightly damp hair will respond badly to straightening. Also using a heated appliance on damp hair causes the hair to "cook" from the steaming, swelling the hair shaft and forcing the protective moisture from the cortex of the hair.
Use a flat iron appropriate for your hair length. Wider irons are suitable for very long hair, but most women are better off using an appliance with heating plates 1" to 1 ½ " wide. These smaller irons offer better control and are lighter in weight.
Section your hair into small, manageable sections. If you try and straighten a big chunk of hair at once, you will get an uneven result. The hair on the outside might straighten but hair in the middle won't have been straightened. Work on smaller sections and you will get a much straighter look.
Use a small amount of styling product to maintain the style. Using a spray of hairspray on the straightened sections, or a small amount of mousse or gel when drying your hair, will extend the life of your hair style. Your straightened hair will last longer.
INSTRUCTIONS
Take a small section of hair. Starting at the roots, work the flat iron through the length of your hair slowly, but keep the iron moving.
After each draw, comb your hair smooth.
Continue, piece by piece until all of your hair is straight.
PROFESSIONAL HAIR STRAIGHTENING
If your hair is not quite as straight as you want it, you have some easy options to temporarily straighten your hair: straightening products, hair dryer or straightening iron.
If your hair is really not straight and you want to get rid of your curl permanently (well, at least 6 months), you have the option of professionally straightening your hair.
HOW TO BLOW DRY HAIR STRAIGHT
Blowdrying your hair straight is definitely the cheaper option to permanently straightening your hair - all it takes is a few tools and products and a bit of practice.
WHAT DO I NEED?
- A hairdryer
- A large round brush. The size of the brush will depend on the length of your hair - your hair needs to be long enough to wrap around the brush once.
- A large paddle brush for final smoothing.
- Clips to keep hair out of the way. Large flat clips that hairdressers use work best.
- Styling products - products that protect your hair from moisture and hold the style. Moisture is what reverts the hair back to its natural wave, so products like mousse protect hair from moisture as well as heat damage.
- Gloss or serum to smooth over hair, remove frizz and finish off the look
- A large round brush. The size of the brush will depend on the length of your hair - your hair needs to be long enough to wrap around the brush once.
- A large paddle brush for final smoothing.
- Clips to keep hair out of the way. Large flat clips that hairdressers use work best.
- Styling products - products that protect your hair from moisture and hold the style. Moisture is what reverts the hair back to its natural wave, so products like mousse protect hair from moisture as well as heat damage.
- Gloss or serum to smooth over hair, remove frizz and finish off the look
Comb with a wide-toothed comb to remove any tangles. Partially blow-dry your hair to get rid of excess moisture.
Spray a volumising tonic on your hair, or a handful of mousse spread from tips to ends for extra oomph.
Pin hair up and take out small sections at a time to blow-dry. Hold the dryer in one hand and a styling brush in the other.
Place the brush underneath the first section of hair and position it at the roots. Keep the tension on the hair (without tugging too hard) and move the brush down towards the ends, while directing the air flow down the hair, following the movement of the brush.
Blow-dry using a large, round brush with a metal core. Wind hair completely up the brush, focusing on creating lift at the roots. Gently blast hair with a hair-dryer until dry.
Browse our range of Hairdryers.
Curl the brush under at the ends to achieve a slight bend. Continue until the back sections are completely dry and then repeat on the top sections of hair.
Remember, practice makes perfect!
HOW TO USE A STRAIGHTENING IRON
WHAT DO I NEED?
- A temperature controlled straightening iron
- Styling products - products that protect your hair from moisture and hold the style. Moisture is what reverts the hair back to its natural wave, so products like mousse protect hair from moisture as well as heat damage.
THINGS TO REMEMBER:
Also start with clean, DRY hair. If possible, use a leave-in conditioning spray after washing your hair, but before starting to straighten.
Hair must be completely dry, as slightly damp hair will respond badly to straightening. Also using a heated appliance on damp hair causes the hair to "cook" from the steaming, swelling the hair shaft and forcing the protective moisture from the cortex of the hair.
Use a flat iron appropriate for your hair length. Wider irons are suitable for very long hair, but most women are better off using an appliance with heating plates 1" to 1 ½ " wide. These smaller irons offer better control and are lighter in weight.
Section your hair into small, manageable sections. If you try and straighten a big chunk of hair at once, you will get an uneven result. The hair on the outside might straighten but hair in the middle won't have been straightened. Work on smaller sections and you will get a much straighter look.
Use a small amount of styling product to maintain the style. Using a spray of hairspray on the straightened sections, or a small amount of mousse or gel when drying your hair, will extend the life of your hair style. Your straightened hair will last longer.
INSTRUCTIONS
Take a small section of hair. Starting at the roots, work the flat iron through the length of your hair slowly, but keep the iron moving.
After each draw, comb your hair smooth.
Continue, piece by piece until all of your hair is straight.
PROFESSIONAL HAIR STRAIGHTENING
PERMANENT STRAIGHTENING
What is it? It's a perm that improves the condition of the hair as it straightens it. There are a few names for it - Bio Ionic Professional Haircare System, Japanese Ionic Hair Straightening - yet they are all the same.
How does it work? First a treatment to prep your hair. Next, a setting solution. Then a rinse and light dry off before hours of flat-iron work. After this, you have straight hair. They rinse again and apply a solution so your hair remembers to stay straight. A quick dry off and iron and you're done. But no washing your hair for two days.
What hair types are (most) suitable? Those with thick, healthy, unbleached hair are the best candidates.
Which hair types are not suitable? Fine, weak or dry hair or hair that is overly processed/colored. However there are lotions that cater to variations in strength and thickness, meaning those with fine but strong hair can still get the treatment.
How long does it take? Usually about five hours. If the hair is very thick, curly or long it can take up to 10 or 11 hours.
How much does it cost? It can range anywhere from $150 to $1000 depending on the salon and the particular solutions being used (ie Bio Ionic is more expensive than Japanese solutions)
Some quick-fixes include using permanent straighteners and relaxers- most of which you can find in supermarkets and drug stores to apply in your own home.
A relaxer is best suited for people who have hair that is especially difficult to style. This usually applies to people of African or Caribbean descent who have coarse and frizzy hair. The relaxer is a strong chemical substance that is applied to dry hair and then left on the hair anywhere from 15 to 45 minutes. The relaxer works chemically with the composition of your hair, weighing it down in certain areas and removing curls. Relaxers must be reapplied to new hair growth.
What is it? It's a perm that improves the condition of the hair as it straightens it. There are a few names for it - Bio Ionic Professional Haircare System, Japanese Ionic Hair Straightening - yet they are all the same.
How does it work? First a treatment to prep your hair. Next, a setting solution. Then a rinse and light dry off before hours of flat-iron work. After this, you have straight hair. They rinse again and apply a solution so your hair remembers to stay straight. A quick dry off and iron and you're done. But no washing your hair for two days.
What hair types are (most) suitable? Those with thick, healthy, unbleached hair are the best candidates.
Which hair types are not suitable? Fine, weak or dry hair or hair that is overly processed/colored. However there are lotions that cater to variations in strength and thickness, meaning those with fine but strong hair can still get the treatment.
How long does it take? Usually about five hours. If the hair is very thick, curly or long it can take up to 10 or 11 hours.
How much does it cost? It can range anywhere from $150 to $1000 depending on the salon and the particular solutions being used (ie Bio Ionic is more expensive than Japanese solutions)
Some quick-fixes include using permanent straighteners and relaxers- most of which you can find in supermarkets and drug stores to apply in your own home.
A relaxer is best suited for people who have hair that is especially difficult to style. This usually applies to people of African or Caribbean descent who have coarse and frizzy hair. The relaxer is a strong chemical substance that is applied to dry hair and then left on the hair anywhere from 15 to 45 minutes. The relaxer works chemically with the composition of your hair, weighing it down in certain areas and removing curls. Relaxers must be reapplied to new hair growth.
Friday, 12 August 2011
How Hot Should Water Be to Clean Hair?
Use Hot Water For A Deep Cleaning
Hot water breaks up oil and product build-up on hair
Using hot water--as hot as is comfortable--will open pores and break up oils near the scalp. The warmer the water, the more oils will break down and be carried away with a rinse. If the hair has extra product or oil on it, hotter water may be the best choice for a thorough cleaning.
Too Much Hot Water Can Be Harmful
The ends of long hair need protection from heat
Using hot water on a regular basis is generally not recommended. If too much of the natural oil is stripped away, then the skin of the scalp could become dry. Also, too much heat--whether from hot water, hot curlers or hair dryers--will eventually cause damage to the individual hairs, causing breaks and split ends. This is a greater concern for those with long hair that is not trimmed as often.
Bottom Line
- The temperature used at most salons for shampooing is lukewarm to warm. For everyday washing--or every other day, as some recommend for preserving natural oils--warm water allows much of the dirt and oils to be carried away, without adding enough heat to dry out the scalp or damage the hair. For extra shine, follow with a cool-water rinse to "lock in" moisture from conditioner and close up hair follicles on the scalp.
Wednesday, 3 August 2011
How Switching Hair Styles Can Boost Self Esteem
If you’re like most women then you probably like to improve your look with a variety of hair styles. Hairstyles not only improve your look, but can also boost your self-esteem. If you’ve been feeling down in the dumps lately and feel like your confidence is at an all-time low, the best thing you can do might just be to head to your favorite salon.
The Importance of Hair Style
If you want to enhance your physical appearance, then there is no doubt that your hair style is one of the factors that you should consider. In fact, if you flip through beauty magazines or watch entertainment programs, you will see how much emphasis the media puts on the ever-changing hair styles of celebrities. To look your most attractive, it is simply not enough to have the right outfit, makeup or accessories. Your hair style is one of the things that people will notice about you, so it’s important that you work on it.
The importance of a good hair style goes beyond improving your appearance. Your hairstyle can also affect the way other people perceive you. For instance, if you regularly go to work with disheveled and unkempt hair, then you will give off the impression that you’re someone who does not prioritize grooming or even hygiene. Your hair style also plays a big role in your level of confidence. Try to remember the last time you had a bad hair day. Didn’t you spend the day feeling self conscious and uncomfortable?
Choosing the Best Hair Style
Now that you know how important hair styles are, it’s time to determine which one will help you look your best. It’s not enough to tell your stylist that you want to look beautiful. It’s important that you know what you want to achieve with your new hair style. The more specific you are, the more your stylist will be able to give you the best look. Before heading down to the salon, determine first what hair style will look best on you.
Know Your Face Shape
Tie your hair back and stand in front of a mirror. Now begin examining your face to find out what your face shape is. Your face shape is the biggest factor to consider when choosing a new hair style. If your face has the ideal oval shape, then you are one of the lucky ones who can try any hair style. If you have a long face then you can balance it with shoulder-length hair styles. If you prefer longer styles, get one with plenty of layers. If you have a full and round face, then your hair style should extend below your chin. Layers around your cheeks can also make your face look slimmer. Try to avoid chin-length cuts and bangs, because these can make your face look fuller. If you have a square-shaped face then your goal should be to soften it. You can do so by choosing hairstyles with waves and curls. When going for a layered look, keep the layers within the same length as your jawline. Shoulder-length hair with layers below the chin looks best if you have a heart-shaped face.
Thursday, 14 July 2011
Keep your Hair Hot in Summer
It is an open secret that in summer our hair is sorely in need of special summer hair care. Among the main summer hair threats are high summer temperatures, sea water and UV-rays. Head overheating causes hair follicle overheating that can’t but lead to hair weakening. Sea water mixed with direct UV-rays makes a terribly harmful cocktail for our hair that causes hair splitting and extreme dryness. Just follow our summer hair care tips and avoid all those ‘hair risks’.
• The most important thing about summer hair care is that in hot summertime you are to opt for various moisturising shampoos and conditioners, as well as hair care remedies containing SPF. Also invest in sun-resisting sprays such as Victoria’s Secret’s Color Protect UV Shield Spray that would help to protect your hair against harmful UV-rays.
• Don’t forget of deep moisturising. Once a week make a moisturising hair mask.
• There is a lot of harmful dirt that sea water contains and your usual daily shampoo couldn't manage to clean your hair properly. That’s why we strongly recommend you to use high-alkaline shampoos once per month to provide your hair with a proper cleansing. But don’t forget to apply a hair mask after using this high PH-level shampoo.
• It is better to reject (as far as possible) using hair tools such as hairdryer, hair strengthener and curler as well as perm and hair dying.
• Besides, try to avoid using hair gels and oils prior to going out in direct sunlight. The sun can cause these hair products to heat up, and put your hair at greater risk for drying.
Source: www.ourvanity.com
Thursday, 23 June 2011
Stars are flipping for the latest style in hair, a deep side part that's casual and adaptable
Celebrities and the cool girls who want to look like them are sporting a new, but familiar, look in hair -- the deep side part.
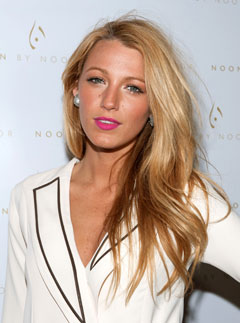
A part that’s an inch or two farther to the side may seem insignificant, but the way in which celebs such as Jessica Alba, Blake Lively and Kristen Stewart are doing it certainly makes a statement that’s casual, flirty and reminiscent of a 1980s Valley girl.
Alba in particular has been wearing a deep side part with a starting point that sometimes looks to be near her ear. The part gives the hair that’s flipped over to the other side of her head some volume and a wave that appears to be waiting to get teased, curled and sprayed as was in vogue through the early ’90s.
Lively and Stewart are also eschewing the typical middle-parted, L.A. boho hair and are going for something edgier in Stewart’s case, and evocative of Veronica Lake in Lively’s version.
"They’re giving us a retro glamour that’s less formal than finger waves," says celebrity hairstylist Scott Cunha, who styles Nicole Richie and Lucy Hale. "The part is deep to the side but the rest is loose, wavy and a little undone."
He recommends using the arch of the eyebrow as a good marker of where to start a deep side part. "You don’t want it over as far your ear," Cunha says. Use a comb to make a clean part and rub a little volumizing mousse through the hair to give it some wave and body. Otherwise a deep side part plus flat hair will leave you looking like a trendy drowned rat.
On the other end of the spectrum, Stewart’s take on the trend is edgy and definitely a little rock ’n’ roll. She showed up to the recent MTV Movie Awards with a deep side part and tons of body in her hair. "I loved her look at the MTV Movie Awards," Cunha says. "She really got the whole thing right."
Source: Los Angeles Times
Subscribe to:
Posts (Atom)